HOW TO START A BLOG WITH HOSTGATOR AND MAKE MONEY?
When I decided to write a post on ‘how to start a monetized blog’, I did not expect it would be so long. It took me around 6 hours to write and edit, and it’s over 3000 words – it is very detailed and it talks about starting a blog with Hostgator and making money. So don’t let the word counts scare you, it is a step by step method on starting a blog and walks you through nearly everything you would need to know about it.
Should I start a blog? It’s no secret that everyone will ask such a question at some point in their online journey. You can start a blog as soon as possible so that years later it will be a money magnet.
It’s a truth that once you’ve fallen in love with blogging, it will become a real addiction. Starting a blog will give you a plethora of new skills, a wonderful and supportive circle of blog readers, and a hobby that is super fun apart from having a profitable blog.
The two questions I always get when I tell people about blogging are “how to start a blog with no money?” and “how to start a monetized blog?” I have already answered that you can start a blog with no money on the free WordPress platforms, but you will not get a unique domain name and website address. So it is better to have a self-hosted WordPress blog with a unique domain name and blog address and I will tell you the ways to make it with virtually no money.
I would like to explain how you can make a self-hosted WordPress blog just like I have started my blog with Hostgator and then made money.
WHY START A SELF-HOSTED BLOG?
If you look at the URL bar (web address), you’ll see that mine is starting with www.bookwebmaster.com, there is no extra attachment like .blogspot or .wordpress in the URL. When I planned to start a blog with no money, I also definitely considered a free option in the beginning. Just after one month of starting a free plan, I decided to invest in my own domain name and hosting with HostGator. But why? Let me explain:
I felt I am serious about blogging and making money online. In order to get better results in Google, you will need to switch to a paid hosting in the end. Apparently it is a pain in the booty to switch your free blog over to a self-hosted WordPress blog after a period and you need the assistance of web developer. So I decided rather to pay for a self-hosted blog from the beginning than paying a professional to transfer my blog.
ISN’T STARTING A BLOG HARD? IF SO, WHY SHOULD I START A BLOG?
Nope, not at all! You don’t need to know how to do programming for starting a monetized blog, all you need to know is how to use a computer! I promise, I am going to detail the process of starting a blog, and if you have any questions at all, no matter how small, just shoot me an e-mail. I will try to reply within 24 hours!
If you are ready to dedicate an extra half hour then you can start a blog today. I am going to tell you the process as easier as possible considering you as a non-technical person.
What you will need to start a blog now and make money at a later stage?
- A small chunk of time (30 minutes, or so) to set up the blog in the beginning.
- Very basic computer knowledge like move the cursor, clicking on what I prompt, and type – seriously, it’s that simple.)
- A credit or debit card or a Paypal account for the payment to book the blog hosting and domain. Yes, there is a very small investment, but I would like to promise you, it is well worth it! (Since I started my blog and posting regularly, I have already made my investment back. And you will also be able to do that, I promise!
YOU SHOULD START A BLOG NOW!

Please note: If you decide to pay the website hosting company that I recommend (and have used it for hosting this blog and many other money-making sites and did not face any kind of hacking or error issues!) and click the link provided, it gives me a bit of appreciation for referring a great new blogger (YOU!!) to them. And you will get a great discount too!!
HOW TO START A BLOG AND MAKE MONEY WITH HOSTGATOR?
STEP ONE – WEB HOSTING WITH HOSTGATOR – HATCHLING PLAN:
Of course, when starting a blog this is the point you can think about free hosting like blogger, but like I’ve cleared before that all serious writers should consider starting the blog on a self-hosted domain.
Let me tell you the truth about the hosting – the number of blog hosting sites out there is quite a lot to make your head spin if you got a chance to do through the various technical specifications and it ranges in price and services.
Personally I bought something cheap that would cover all of my needs and ensured there will be a chat option for technical support to fix any unknown errors caused by me. I didn’t really want to be paying for a set of technical features that I wouldn’t need.
So I chose to host this blog with Hostgator because they offer unlimited disk and bandwidth space, they have great 24/7 chat support, and all that comes at an incredibly affordable price. In addition, while many bloggers often complain about technical support and downtime – so far I’ve never been hit by such issues as far as I know! And I am happy that I own a monetized blog now.
If you choose Hostgator, be sure to use coupon code “BookWebmaster” so you can save 25%
Now it is time to go to the HostGator website and start the process of getting your blog to life! As soon as you enter the website look for “Web Hosting Plans” (Hatchling / Baby / Business).
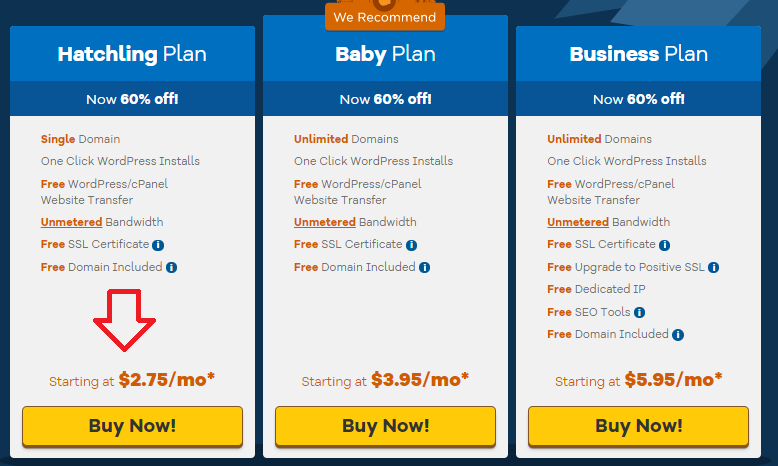
When you are presented with three choices of web hosting plans, I personally recommend buying the cheapest plan ‘Hatchling Plan‘ since you are just starting your blog and you may not need anything bigger than that even if you grow organically for another few years. If you are ready to invest a bit more dollars, you can also consider choosing a Baby Plan or Business Plan, in case you plan to own more than one domain or blog in the future or you need all the technical features listed under it.
CHOOSING THE DOMAIN FOR A NEW BLOG

Now it’s time for you to grab your domain. It is a piece of great news that Hostgator offers 1 year free domain this season.
Before booking a domain you need to think long and hard about it as you are building a brand around this domain. So keep a few points in mind while booking a domain for a blog:
- Most of the fancy domains are not available now as they are already booked.
- Try different variations of the name keeping it simple for typing and reading.
- There is nothing special in getting a name exactly like that of your niche as search engines will rank the blog based on contents and not domain alphabets. Though it would be great to book a domain similar to your niche and it will be easier for your visitors to predict the contents on the site based on the domain name.
- Don’t try to add numbers to your blog name. BookWebmaster.com is so much classier to type than BookWemaster123.com!
Once you found the perfect domain name and enter it into the space provided and choose .com (unless you prefer a country related domain, but I highly recommend using .com extension as generally the visibility is more with it in Google)
Now just fill up the rest of the details on the page – You may choose ‘hatchling’ and a hosting duration (I recommend to commit to at least one year though you can count more years to get the best rate), select a username and security pin and fill out your billing and payment information.
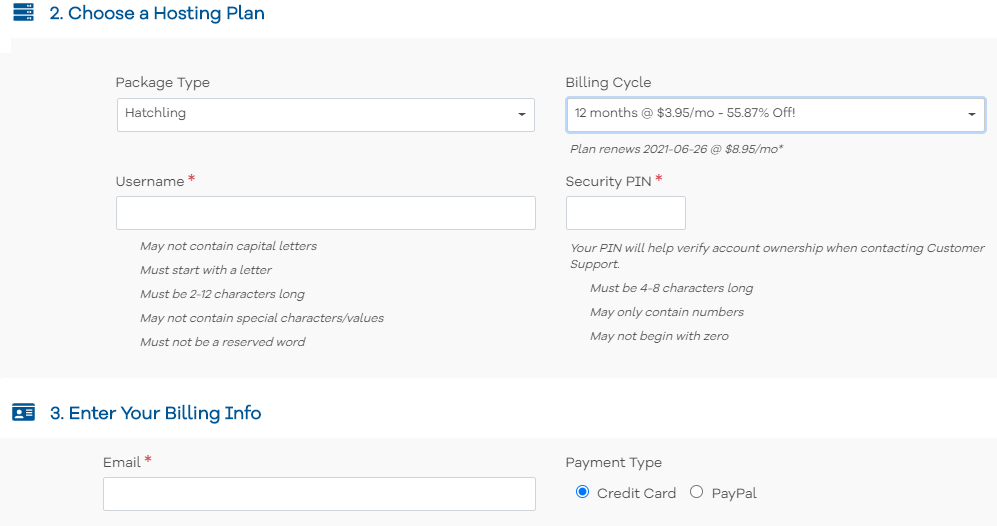
While booking the hosting it might ask you to choose many add-ons (additional services such as SSL Certificates SiteLock Essentials etc.), they are entirely up to you. There is nothing going to be wrong even if you did not buy any add-ons so I didn’t buy any but again, it’s up to the person. Free SSL will be automatically installed on your domain by Hostgator after 24 hours. You will be able to use free plugins to perform most of those services they provide if you really needed it at a later stage.
Now it will give an option to insert a coupon code – and lucky duck, you do! Type in “BookWebmaster” so you may receive your discount!
Once all done just click “Create your account!”
THE FUN PART IS AT THE START OF THE BLOG!
Now let us install WordPress CMS and start actually creating that beautiful blog of yours! Needless to say, if you use HostGator web hosting then this step will be super easy! Hostgator has the ability to do a quick WordPress install into your hosting space.
If you check your email now, your log-in information for your control panel should be reached there. You can go to your control panel by either typing in yourdomain.com/cpanel where you can replace it with your actual domain or going to the link within your email.
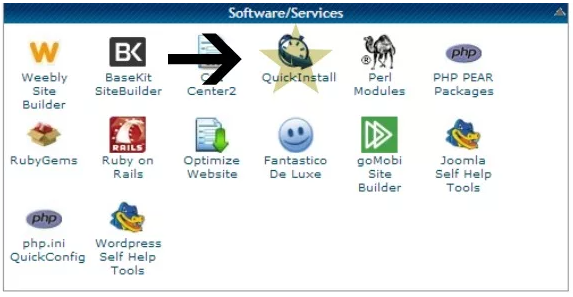
From the control panel, installing the WordPress platform is easy. Just click the ‘Quick Install’ button under Software/Services and then you need to select WordPress on the next screen.
Now you can fill some information there and choose whether or not to allow auto-updates. I did not allow auto-updates in my blog, as I like to feel in control of it, although in the image below I left it checked. You can decide the locations of your WordPress files (at the root or any optional path such as domain.com/blog).
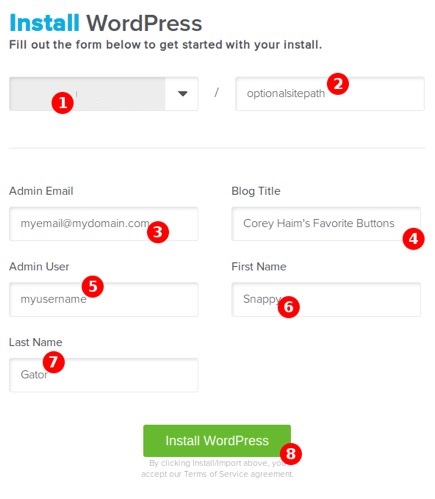
Last winter I helped a friend set up his personal blog, and it took nearly an hour and a half for his account to be active. When I started my blog it was done right away, but in general, it may take a few hours, so be patient!
Seen below is a WordPress dashboard. There is not a lot to start a WordPress blog, but you’ll find a lot of ways to use it.
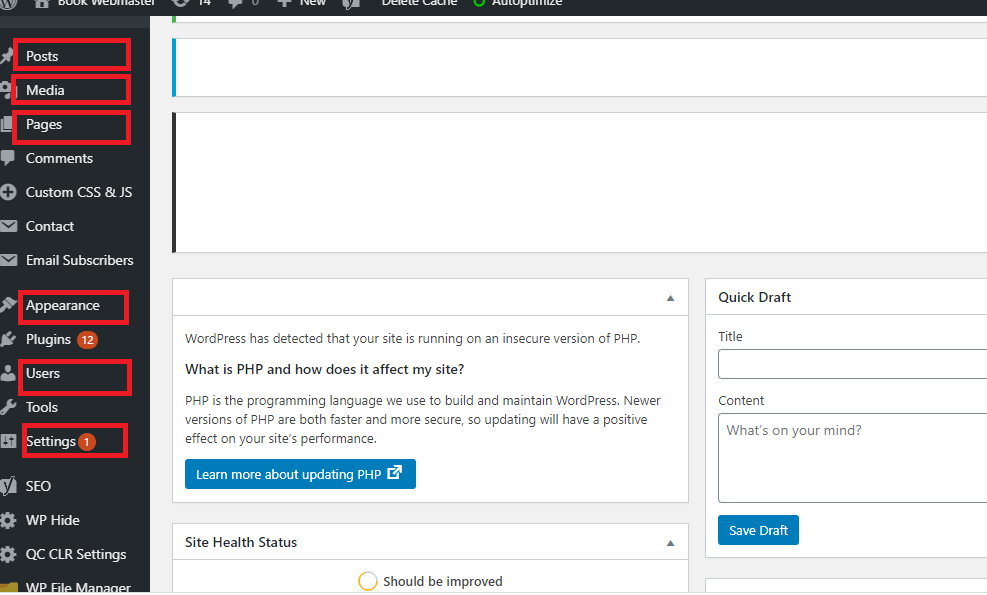
Posts: This is the place to post your articles by adding as new posts or edit old ones. We will discuss it later in this guide, but for now, let me explain the other essential features a little further.
Media: Whenever you upload pictures, videos, and other files it will be stored in this area. If I’m being honest, you may never use this media area other than for renaming the images or picking the URL of the image/files.
Pages: Here is where you will be able to pages like about us/contact us etc and then later you can use Appearance -> Menu to set that page as your menu.
Comments: This is the place where you’ll go to check all of the comments posted on your blog articles!
Appearance: Here is the core space where you’ll spend the most time at the starting point of the blog deciding how you want your blog to look. You can pick out themes, mess around with widgets that your navigation bar and set your menu for header and footer.
Plug-ins: Plug-ins are another fun and very important part of your site where you can install many useful plugins and activate them (example SEO plugin: Yoast). Plugins can add cool features and interfaces for a flexible way of working.
Users: Yo can find the users in your blog here. Currently, you are the only user as you just started your blog and you did not have an email subscription on your blog.
Tools: Right now, you won’t need this except for import and export options. Some plugins like velvet sit on it after activating it.
Settings: Here you can find all of the general settings for writing, reading, permalink structure, and commenting settings.etc that you can play around with.
WordPress Theme
Every blog can have a style that we call a ‘theme’. Now it is time to set a theme for your newly started blog. You can go to ‘Appearance’ and finding a free theme that you really like. At this point don’t necessarily need a paid theme until you are absolutely sure that blogging is something you invest your time for future. As soon as you find a theme there, you will be able to install and then activate it. Once you did the activation it should be up for your blog and whatever you post through Posts -> Add New will be displayed on the blog as per the style.
If you really need to use a paid theme you can buy it from Envato or GeneratePress. You can also try the Astra theme. If you are a girl I would recommend a feminine theme. You can buy it from Bluechic as I have seen many successful female bloggers using Bluechic, which implies that it is one of the best performing the WordPress themes. Once you bought a new theme you will be able to add and activate it in your blog through Appearance -> Themes -> Add New. The old style of your blog will be automatically replaced by a new theme. If you need a paid theme installation service feel free to contact me.
You started your blog with Hostgator now and It is time to add pages and posts:
Now let us learn to add content to your blog in detail! First You can go to Pages>Add new and create an ‘about me’ page. Yes, these are terribly awkward to write about oneself but they are a standard necessity to any newly started blog. Once you fell in love with blogs and online money making, you will start reading the blogger’s ‘about me’ pages to know more about the way they blog and make money. I used to do in my early days of blogging and still do to connect to the blogger of my choice.
Once the ‘about’ page is ready, you can think about adding a ‘contact’ page which is almost necessary.
Using Appearance -> Menus -> Add Menu Items -> Custom Links you can get a menu items by adding the page URL and link text.
You can publish your first post(s) through Posts -> Add New and all the posts will be displayed on the home page if you did not change the settings of your home page in the ‘Reading’ section of the ‘Settings’ page.
The top bar on your post editor (classic editor) is where you will be able to customize the look of your content. You can edit the justification, add links, insert a read more option, change the text size, underline, justify, and adjust the color from the post editor. If you did not find a post editor on top of your post editor you will probably be using a block editor. In such a case you can install a new plugin called ‘Classic Editor’ and activate it. You will get a more user-friendly editor for posts. It just takes some time playing around with the classic editor/block editor to get used to it, before publishing your first blog post.
PLUGINS AND WIDGETS
Many bloggers including me choose WordPress as a blogging platform that it has got a vast array of plugins and widgets that allow you to customize your blog to any extreme. There can be a plugin or widget available for everything that you think a developer can only do.
It’s important that you don’t want to install so many plugins as they will slow your blog down if there are a lot.
Here is the recommend plugins once you just started your blog with Hostgator:
Limit Log-in Attempts: This plugin is going to help prevent people from breaking into your blog by repeated trial login attempts, it’s an absolute necessity to limit such innumerable number of login attempts if you ask me.
SEO Plugin: These plugins will help you to work on search engine optimization (SEO), meaning your posts will be more likely to be seen on the front pages of Google if you use SEO plugins. Read here to choose the best SEO plugin.
WP Super Cache: This will speed up your site and cache all of the content on your blog so that you will get better speed ranking by Google! Just set up the default ones and better not to go for advanced settings at the start.
You will probably need more plugins as you grow with your blogging, but these are just the basic requirements. Feel free to explore this plugin section that will benefit your newly started blog!
Some Widgets that I recommend as soon as you started your blog:
Social Media Plugins and Widgets: This is where links to your social media pages for Facebook, Twitter, Pinterest, etc. will show up. A huge part of successful money-making blogging is networking and displaying your posts to readers at a place where they can find it super easy. Many paid themes come with social media plugins as an available widget, but if your free theme doesn’t have one you can add a free plugin that will create a widget for you
Subscribe: You will want a subscription plugin to collect the email ids of your readers and then later sending them many marketing posts to start a monetized blog. You will be able to add a little subscribe button on your sidebar by installing an appropriate plugin to build up your email list.
And now your question ‘how to start a blog with no money’ has ended up with a working blog for you!
Clap! look at you! You have officially started a new blog yourself. You’ve made a blog with a great theme and all of the necessary plugins and widgets! Now it’s up to you to ensure that you prepare keyword-rich articles and post regularly, create pinnable images, build backlinks, and network with other bloggers.
And remember, if you have any questions about setting up your blog, please don’t hesitate to reach out to me! Since you have used my coupon code to book Hostgator hosting, I would be more than happy to help you to start your blog. No more excuses to keep you away, you should start your blog right away!
I really wish if this post helped you start your blog on Hostgator.
Once you’ve finished setting up a blog on Hostgator, leave a comment down below so I can check it out and reply! I am so excited to see the new blog you have started with!
P.S. I have posted an elaborate article on making money with a blog for a beginner. Read it here.

2 Comments